This page guides you through:
| Table of Contents |
|---|
Page Content
| Table of Contents | ||||||||||||||||||
|---|---|---|---|---|---|---|---|---|---|---|---|---|---|---|---|---|---|---|
|
Here we describe the installation of RT-LAB host and target components on a Windows PC.
...
Install a version of MATLAB™. You need the following toolboxes from MathWorks:
Simulink
Simulink Coder
- SimPowerSystems
Simscape Electrical Specialized Power Systems (SPS) (only for electrical simulations)
MATLAB™ Coder (optional)
Stateflow (optional)
Close all instances of MATLAB™.
...
The software can be downloaded directly from:
https://www.opal-rt.com/download-center/
Register as required and complete the on-screen directions.
Wait for the Setup Wizard to open. If the wizard fails to start automatically, browse the contents of the disk, and run Setup/Setup.exe. (You will need administrator privileges.)
...
Follow the on-screen instructions to go through the installation process.
Please wait while RT-LAB is installed. This will only take a few minutes.
Once RT-LAB has been installed on your computer, click Finish to close the Wizard.
The RT-LAB installation software creates or modifies the following files:
<MATLAB_ROOT>\toolbox\local\startup.m, for each version of MATLAB.
<MATLAB_ROOT>\toolbox\local\setup_rtlab.m, for each version of MATLAB.
The RT-LAB installation software also adds the following paths to MATLAB:
<RT-LAB
installation
dir>\common\bin
<RT-LAB
installation
dir>\Simulink\rtw\c\common
<RT-LAB
installation
dir>\Simulink\libr[xxxxx]
<RT-LAB
installation
dir>\Simulink\m
<RT-LAB
installation
dir>\common\bin\x32
...where rxxxxx is r2011b r2020a for MATLAB 79.138, r2012a r2022b for MATLAB 79.14 13 and so on.
Configuring your Firewall Application
...
You must give access to the following programs through your firewall application before launching RT-LAB:
| Code Block |
|---|
<RT-LAB installation dir>\common\ui\RT-LAB.exe <RT-LAB installation dir>\common\bin\Controller.exe <RT-LAB installation dir>\common\bin\MetaController.exe <RT-LAB installation dir>\common\bin\OpalD.exe <RT-LAB installation dir>\common\bin\OpalDLoader.exe <RT-LAB installation dir>\common\bin\x32\OpalNode.exe <RT-LAB installation dir>\common\bin\x32\PanelViewerXXXX.exe |
...(where XXXX represents the supported LabVIEW versions).
As an example, the following procedure shows how to manually configure Windows Firewall (once again, performing these steps is not necessary if you have accepted the automatic configuration).
Launch the Windows Firewall.
Click Allow a program or feature through Windows Firewall.
In the new window, click Allow another program...
In the new window, click Browse... and choose the programs listed above.
If you have any questions about the configuration of your firewall application, please contact the third-party software’s technical support. If RT-LAB presents any undesirable behavior arising from this configuration, please contact OPAL-RT's support team https://www.opal-rt.com/support-home/
Starting RT-LAB
To launch the RT-LAB interface:
Double-click the RT-LAB shortcut on your Desktop,
Or use the Windows start menu (All Programs/OPAL-RT/RT-
LABv2017LABv2023.X.Y.Z/
RTLABRT-LAB).
You are then asked to select a workspace.
Click the box labeled Use this as default and do not ask again if you would like to establish a default directory.
...
Selecting a workspace
The workspace is the directory in which RT-LAB will store all the files required for your simulations. We recommend you create a new and empty directory, as this will help you understand the exercises in this guide.
Click the OK button and wait for the Welcome page to appear.
...
Welcome page
The Welcome page provides quick access to tutorials and documentation. You can open it later from the menu Help/Welcome.
For now, click Go to the workbench to open the main RT-LAB window.
...
RT-LAB workbench
Validating the installation
For validation, we recommend that you verify that all toolboxes have been installed in MATLAB™.
Open MATLAB™.
Type ‘’ver’’ in the command window of MATLAB™.
Verify that you see the following toolboxes from OPAL-RT:
RT-LAB
ARTEMIS Blockset (optional depending on license)
RT-EVENTS Blockset (optional depending on license)
RT-XSG (optional depending on license)
If any of the OPAL-RT toolboxes have not been installed in your instance of MATLAB™, you can add them manually. Run the “m” script (at the following locations) in your MATLAB™ to install them.
RT-LAB | C:\OPAL-RT\RT-LAB\[RT-Lab |
|---|
version]\simulink\m\setup_rtlab.m | |
ARTEMIS Blockset | C:\OPAL-RT\ARTEMIS\[ARTEMIS |
|---|
version]\art_m\setup_artemis.m | |
RT-EVENTS Blockset | C:\OPAL-RT\RT-EVENTS\[RT-EVENTS |
|---|
version]\rte_m\setup_rtevents.m | |
RT-XSG | C:\OPAL-RT\RT-XSG\[RT-XSG |
|---|
version]\rtxsg_m\setup_rtxsg.m |
Installing the LabVIEW API
...
LabVIEW must be installed first and the API must be installed for each version of LabVIEW you want to use.
Run <RT-LAB installation dir>\labview\XXXX\Volume\setup.exe
...(where XXXX represents the desired LabVIEW version)Follow the instructions, and click Finish once the installation is complete.
Installing TestStand
During the installation process, RT-LAB will add certain files to TestStand if TestStand was installed prior to installing RT-LAB. RT-LAB makes all the necessary adjustments so that most of the RT-LAB API functions can be readily used in TestStand.
...
One additional adjustment to TestStand that you may want to perform manually to avoid having to locate OpalApiTs.dll when you open sequences that use the RT-LAB API is the following:
Run TestStand, and log in as administrator.
Go to the Configure menu and open the Search Directories window.
Make sure the item PATH environment variable is checked.
Click OK to apply any changes.
| Background Colornote | ||
|---|---|---|
| ||
Warning: It is strongly discouraged to add the complete path to the location of OpalApiTs.dll for a given RT-LAB release because this path will not be updated when you install a newer version of RT-LAB. |
Configuring ScopeView with EMTP-RT
...
To do so, follow these steps:
Click the Windows Start > Run ... menu or click WIN+R.
Start the Registry Editor by typing regedit.exe
Locate the following registry:
HKEY_LOCAL_MACHINE\SOFTWARE\ScopeView.
Change the InstallPath value to the ScopeView installation folder package with RT-LAB. Example: <RT-LAB installation dir>\ScopeView.
Setting Up the Windows PC as a Target Node
...
To correct the situation, you need to do the following:
Press the Windows Start button, and start typing Edit the system environment variables. Click the match in the Control Panel section.
...
Edit the system environment variables
In the System Properties window, under the Advanced tab, click Environment Variables...
In the System variables section, select the Path variable and click Edit...
...
Append the following paths to the Variable value field (with a semi-colon between each path). Note that these paths correspond to a typical installation of Visual Studio.
C:\Program
Files
(x86)\Microsoft
Visual
Studio
10.0\Common7\Tools
C:\Program
Files
(x86)\Microsoft
Visual
Studio
10.0\VC\bin
Your command station is now ready to compile, execute and debug models.
...
If internet access is available from the host Windows system, perform the following operations:
From the file explorer, open the <RT-LAB installation dir>\mingw directory.
Double-click on mingw_download.bat the launch the installation and wait for completion (it can take several minutes).
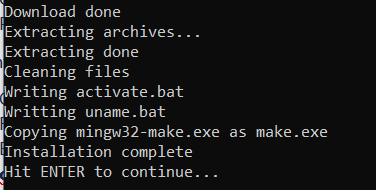
Once completed, the final lines of the command output should match the following:

Press ENTER to close the command window.
If no internet access is available on the Windows host system, perform the following operations:
Copy and transfer the <RT-LAB installation dir>\mingw\mingw_download.bat to a Windows computer from which internet is available.
From the computer which has internet access, open a Command Prompt window
Ensure the current directory of the command window matches the directory where mingw_download.bat has been copied using the command
cd <myfolder>Perform the download of MinGW using the following command where tmpmingw can be replaced by any folder of your choice. It can take several minutes.
mingw_download.bat -d tmpmingw
Once completed, the final lines of the command output should be similar to the following:
...
Press ENTER to complete the command
Copy and transfer the entirety of the tmpmingw folder to the Windows system on which RT-LAB has been installed
From the Windows host computer, open a Command Prompt window
From the command window, move to the mingw folder within the installation of RT-LAB using the following command:
cd <RT-LAB installation dir>\mingwPerform the installation of MinGW using the following command where <My Directory>\tmpmingw designates the folder where the MinGW installation files were transferred:
mingw_download.bat -i <My Directory>\tmpmingwOnce completed, the final lines of the command output should be similar to the following:
...
Press ENTER to complete the command
Displaying localhost
In order to display the Windows command station as a target node:
In the Project Explorer, click Filter targets.
...
Check Show ’localhost’ target.
...
Click OK.
| Background Color | color | #D3D3D3
|---|
| Info |
Note: A license is needed to use a target node. For more information, read about Activating a License on the Target Node. |