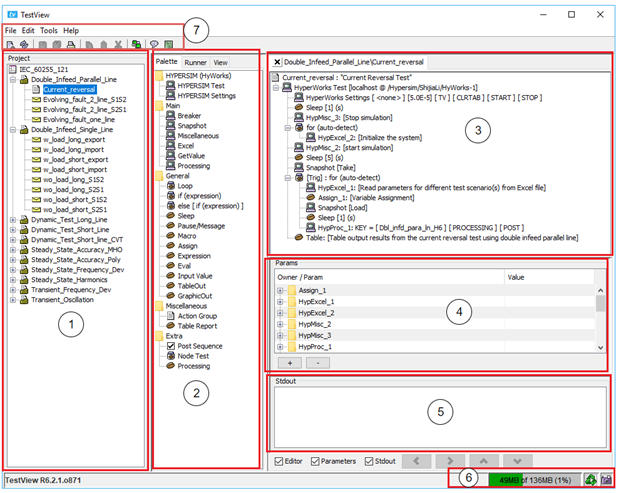
Main Window
You can open TestView from HYPERSIM, by using the TestView button in the HYPERSIM tab.
| (1) Project explorer | All the studies and tests in the current project are accessed from this panel. |
| (2) Palette, Runner and View tabs | To edit, run, and view results. |
| (3) Script window | To edit the test. The commands can be moved using the arrows near the number 6. |
| (4) Parameters window | All command parameters are displayed in this window. |
| (5) Stdout (Console window) | The test verbose results are displayed in this window. |
| (6) Memory monitoring | Real-time monitoring of the Java Heap Memory from the program. |
| (7) Contextual menu and shortcuts | To access the different options from TestView. |
Main Window Menus
NOTE that names given to these various elements may NOT have spaces in them.
File Menu | |
|---|---|
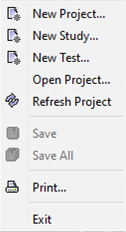
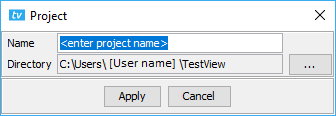
New Project… | Displays the window below. Enter a name for the project. Clicking Apply closes the project that was already open if any, and opens a new project. If the user types the name of a project that already exists, it opens the existing one instead of creating a new one. |
New Study… | Displays the window below. Enter a name for the study. A study can regroup several tests and can even regroup studies. Clicking Apply adds a new study to the current project. |
New Test… | Displays the windows below. Enter a name for the test. A test may or may not be created inside a study. It depends on the selected option in the Project Explorer window. Clicking Apply to the first dialog box will open the second dialog box. The description field is optional. |
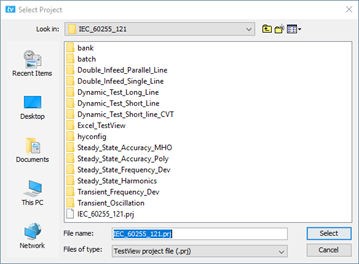
Open Project… | Displays the window below. Select a TestView project file (.prj). Only .prj files are supported in TestView. Selecting a .prj file closes the opened project and opens the selected project. |
Refresh Project | Click to refresh the Project explorer window. If a study file is deleted, for instance, the change is not visible in the Project explorer without clicking on Refresh Project. |
Save | Click to save the currently selected test. This option is grayed out if no test is selected or open. |
Save All | Click to save all the tests modified in the project. This option is grayed out if no test is open. |
| This option is currently not supported. Do not use. | |
| Exit | Clicking this option closes the program. |
Edit Menu
Copy [Selected Command] | Use this option to copy a command that is currently selected in the opened script in the Script window. This option will be grayed out if no command is selected. The text in parenthesis will change depending on the command selected in the script. |
|---|---|
Paste [Selected Command] | Use this option to paste commands in the Script window that is currently open. It will be pasted directly underneath the selected command in the Script window. This option will be grayed out if no command is copied or cut. The text in parenthesis will change depending on the command copied or cut in the script. |
Cut [Selected Command] | Use this option to copy and delete a command from the currently opened test in the Script window. This option will be grayed out if no command is selected. T he text in parenthesis will change depending on the command selected in the script. |
Tools Menu
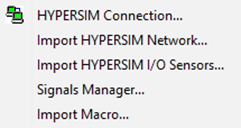
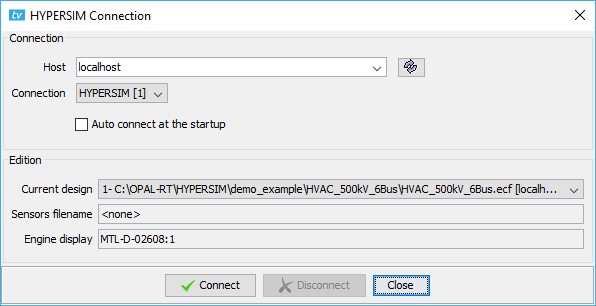
HYPERSIM Connection
Displays the window below. The connection option is to select which HYPERSIM to connect to. If there are two opened instances of HYPERSIM for example, the user would have the choice to select between HYPERSIM [1] and HYPERSIM [2]. In the Edition section, the current design dropdown menu has a list of all the models that are open in one HYPERSIM instance. It is recommended to only have one model open while working with TestView.
Note: It is important to keep in mind that TestView does not interact directly with the original model. When a script is executed for the first time, TestView will make a copy of the model in the TestView project directory and interact with this model onwards.
If the copy is detected in the project folder, it will not re-copy the original model again. Therefore, if some modifications are made to the original model after the copy was made, the modifications will not be applied to the copy, thus they will not be affecting the test sequence.
Import HYPERSIM Network
Deprecated functionality. Import a .sch model (legacy Linux user interface) to the project.
Import HYPERSIM I/O Sensors
Import signal sensors (.sig) to the project. It has the same functionality as importing the sensors from the HYPERSIM Settings command.
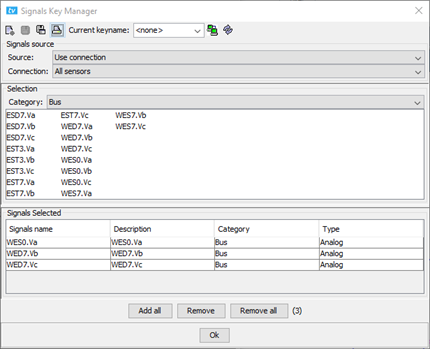
Signals Manager
Display the window below. The Signals Key Manager is similar to the Sensors form in HYPERSIM.
However, considerations must be taken here for the performance of the test sequence as every signal selected will be acquired with every test, based on the parameters entered in the Processing command.
One more signal might not be perceptible, but hundreds more signals could mean several more seconds at each test, which would lead to a few more hours to run an entire test sequence with thousands of tests.
The HYPERSIM Connection symbol is two small computers. That icon is present in several commands.
- If the screens are green, it means that the connection is working.
- If the screens are yellow, it means that the connection is not working.
Problem with the connection between HYPERSIM and TestView?
If you have issues with the connection, you can close TestView, run a simulation on the desired model (using the copy which is in bank -> hnk in the project directory), stop the simulation and re-open TestView.
The source can only be ‘Use Connection’. It will fetch all the available signals from the model in HYPERSIM connected to TestView. If no signal is visible in the Selection window, it means that the connection to the model is not established. Press on the connection button (the two small computers besides the current keyname) to connect to a model.
It is important to give a keyname and press Save before Ok or else the modifications are discarded.
The signal key will be available for selection in the Processing command.
Import Macro
Import a macro to the project (C-Shell script .csh).
Help Menu
About
Gets the version used.
User Manual
Opens the user manual.
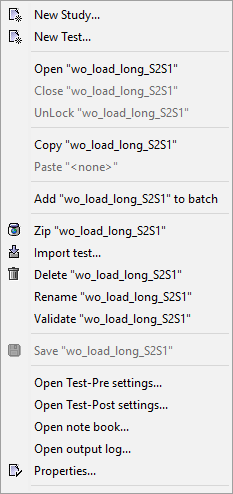
Right-Click Menu in Project Explorer
New Study
Display the window below. Enter a name for the study. A study can regroup several tests and can even regroup studies.
Clicking Apply will add a new study to the current project. The name of the study cannot have spaces.
New Test
Display the windows below. Enter a name for the test. A test may or may not be created inside a study. It depends on the selected option in the Project Explorer window.
Clicking Apply to the first dialog box will open the second dialog box.
The description field is optional. The name of the test cannot have spaces.
Open [Name of Test/Study/Project]
Open the selected test in the Script window. If it is used in a study, it will open all the tests from that study. If it is used on a project, it opens all the tests from that project.
Close [Name of Test/Study/Project]
Close the selected test in the Script window. If it is used in a study, it will close all the tests from that study. If it is used on a project, it closes all the tests from that project.
Unlock [Name of Test/Study/Project]
Unlock the selected test. The lock/unlock principle is to maintain data integrity, that is, as soon as a test finishes, it will lock the data to prevent unwanted overwrites.
The data cannot be overwritten by another run of the test unless the test is unlocked by the user (or the auto-unlock option is enabled in the Runner tab).
Copy [Name of Test/Study]
Copy the selected test/study. This option is not available for a whole project.
Paste [Name of Copied Test/Study]
Paste the copied test/study. A test can be copied from one study to another or into the same study. A suffix will be automatically added in the latter case. A study can be copied within the same project or to another project.
A suffix will be added in the former case.
Add [Name of Test/Study/Project] to Batch
Add the selected test to the batch test list which is visible in the Runner tab. The same test can be added more than once in a batch list. If the option is clicked on a study, it will add all the tests from that study.
If the option is clicked on a project, it will add all the tests from the project (including those in studies).
Zip [Name of Test/Study]
Select to create a zip of the file/folder selected. It will close the test(s) if any are open and will make a zip in the project directory. This option does not work for the project as a whole.
Import test
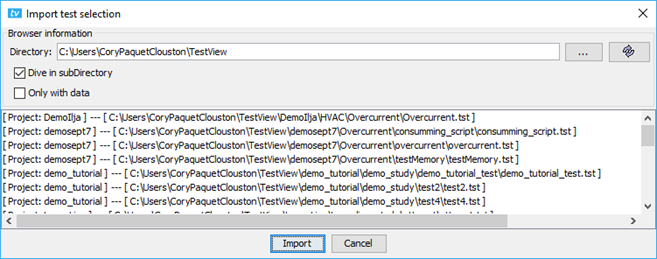
Display the window below. Select the directory to display the detected tests (.tst format). Select the option ‘Dive in subDirectory’ to display the tests that are also in sub-folders (for instance, in studies).
Delete [Name of Test/Study]
Delete permanently the selected test/study.
Rename [Name of Test]
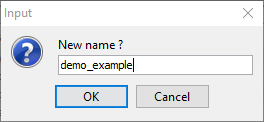
Display the window below. Type the new name and press OK to apply the changes.
Validate [Name of Test/study/Project]
Deprecated.
Save [Name of Test/Study/Project]
Save the selected test/study/project.
Open Test Pre-settings
Display the window below. It is a simple text editor in which the user can type some comments that will be displayed at the beginning of the test if the option is enabled in the View Tab.
Open Test Post-Settings
Similarly to the test pre-settings, it is a simple text editor in which the user can type some comments that will be displayed at the end of the test if the option is enabled in the View Tab.
Open Note Book
Similarly to the test pre-settings and post-settings, it is a simple text editor in which the user can type some comments. They will not be displayed during the test.
Open Output Log
The Output log is the file that contains what is displayed in the Stdout console during the execution a test sequence. For instance, it can be useful if the user wants to look at the output of a test sequence that was executed previously (as the console is cleared between each test sequence).
Properties…
Display the window below with the test name and its directory.
Create a PDF Database
Deprecated. Visible only when right-clicking on the project’s name in the Explorer window.
Create a CSV Database
Deprecated. Visible only when right-clicking on the project’s name in the Explorer window.
Right-Click Menu in Script Window
Properties…
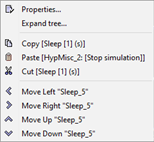
Open the dialog box of the selected command.
Expand tree…
Open all the folded code sections over the whole test.
Copy [Name of Selected Command]
Copy the selected command. It is possible to copy-paste a command from one test to another.
Paste [Name of Copied Command]
Paste the copied command underneath the selected step in the Script window. It is possible to copy-paste a command from one test to another.
Cut [Name of Selected Command]
Cut the selected command (i.e. to copy and delete it). It is possible to cut-paste a command from one test to another.
Move Left [Name of Selected Command]
Move the selected command left of its current position. For instance, if the command is in a loop, moving left will move the command outside the loop.
Move Right [Name of Selected Command]
Move the selected command right of its current position. For instance, if the command is before a loop, moving right will move the command inside the loop.
Move Up [Name of Selected Command]
Move the selected command up of its current position. Does not move the command in or out of a loop.
Move Down [Name of Selected Command]
Move the selected command down of its current position. Does not move the command in or out of a loop.
Palette, Runner and View Tabs
Palette Tab
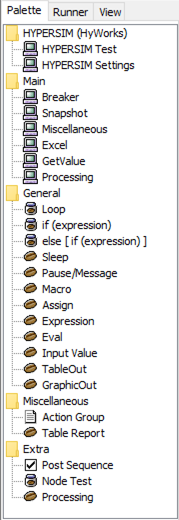
The Palette tab contains all possible commands available to the user. Each command has a GUI allowing the user to input the required parameter values. Each command is explained here. A command will be added underneath the selected command in the Script window after the information is filled in the dialog box to create the test. The only command that can be added to the root of a script (i.e. to the highest level in the Script window) is the HYPERSIM Test command. Therefore, in a new script, if the user tries to add any other commands, there will be an error prompt and the information written in the dialog box will be lost.
Runner Tab
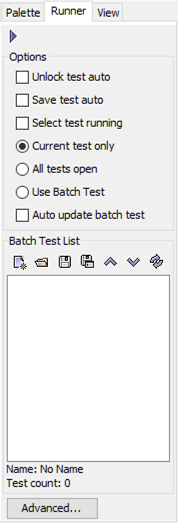
The Runner tab gives a few options regarding which test sequence to run and in what order. It allows programming batch tests.
Options
| Unlock test auto | If checked, when a test is run, it will be automatically unlocked without warning. If unchecked and the test is locked, there will be a prompt asking the permission to unlock the test before running it. |
|---|---|
| Save test auto | If checked, when a test is run, it will be automatically saved without warning. If unchecked and some modifications are detected, there will be a prompt asking permission to save before running the test. |
| (Radio button) Current test only / All tests open / Use Batch Test | Defines the behavior of the play button (the arrow sign in the Runner tab). |
| Executes only the test that is displayed in the Script window. |
| Executes all the tests that are open in the Script window, starting by the one displayed. |
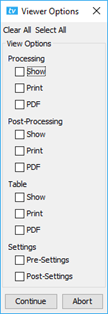
| Executes the tests in the Batch Test List even if they are not open in the Script window. To add a test in the Batch Test List, right-click on any test’s name in the Project Explorer and select ‘Add [Name of test] to batch'. When the ‘Use Batch Test’ mode is selected, a Viewer Options dialog box will appear with the same options as in the View tab (explained further below). Select the desired options. Usually, a batch test executes several test sequences in a row, thus it is usually not interesting to display the processing signals for instance as it pauses the execution until the user closes the window. If the batch test list is empty, the play button will do nothing. |
Batch Test List
| Clear batch-test list | Clear the current batch test list. |
|---|---|
| Load a batch test file | Load a batch test file to TestView. |
| Save the batch-test list in a current batch file | If the batch file was not previously saved, it will ask a for a name and a location. If the file exists, it will overwrite it with the latest modifications. |
| Save batch-test list as a new batch file | Save the batch file under a new name. |
| Move up current test selected in list | Move the currently selected test up in the list (tests are always executed from top to bottom). |
| Move down current test selected in list | Move the currently selected test down in the list (tests are always executed from top to bottom). |
| Create a new batch-test list with open test list | Creates a new batch-test list with the tests in the Script window that have not already been executed (and are locked). |
View Tab
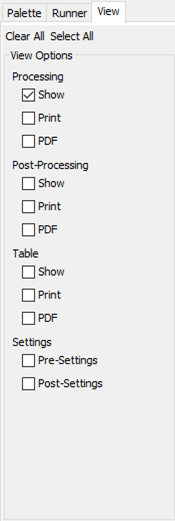
The View tab gives a few options to display results while the test sequence is running. It also allows for saving the graphical results in a PDF file.
Processing, Post-Processing, and Table
All those options supersede the options in the Processing command. This way, no need to manually go through each test to disable the viewing options. If everything is unchecked, there will be no dialog box (e.g. ScopeView window) that will appear during the execution of a test sequence (except if the command Pause/Message is used). It might be worth noting that the template of the processing window can be edited and saved for further use whenever the ScopeView window is opened.
Settings (Pre and Post-Settings)
It is possible for the user to write some comments that will be printed in the Stdout console before (pre-settings) and/or after (post-settings) the execution of a test sequence. Unchecking those options will hide those comments, as to avoid pausing the simulation. The user can edit pre- and post-settings comments by right-clicking on the name of a test in the Project Explorer window and selecting the corresponding option. More details on those here.
