Documentation Home Page ◇ HYPERSIM Home Page
Pour la documentation en FRANÇAIS, utilisez l'outil de traduction de votre navigateur Chrome, Edge ou Safari. Voir un exemple.
TestView Command | Main | Processing
The Processing command makes the bridge between the TestView engine and the HYPERSIM engine for a test. This command is the one that runs acquisitions. Therefore, if several iterations must be done, this command should be placed inside a loop.
General Tab
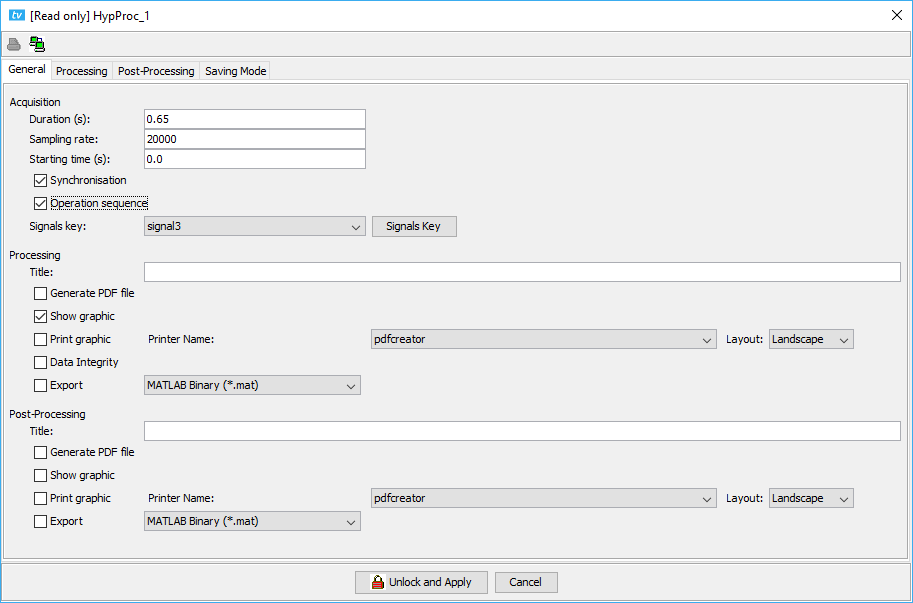
The 'General' tab defines the different settings for the acquisition and what shall be generated in the data folder.
Acquisition section: Define the duration of one test (similarly to ScopeView). Make sure the sampling rate is coherent with the time step in the HYPERSIM Settings to avoid linear interpolation between samples. The 'Starting time (s)’ allows offsetting the time at which data starts being saved in relation to the t=0 of the acquisition command. The ‘Synchronization’ and ‘Operation sequence’ operate in the same way respectively as ‘Sync’ and ‘Trig’ do in ScopeView. If ‘Synchronization’ is checked, it will synchronize the beginning of the acquisition with the Point-On-Wave command in the model. If ‘Operation sequence’ is checked, it will enable the events to occur (e.g. the operation of breakers). The signals key is used to select the relevant signals for the acquisition.
The supported formats to export the data are: Joint Photographic Expert Group (*.jpg), MATLAB Binary (*.mat), Portable Network Graphic (*.png), PostScript (*.ps) and Text (tab separator) (*.txt).
Processing and Post-Processing sections: These two sections have the same options that are available in the ‘View’ tab of the main TestView window. Both options (i.e. the one in the Processing command and the one in the ‘View’ tab) must be checked to be activated. This way, each test sequence has local parameters that can be either activated or overridden through the 'View' tab.
The ‘Title’ option does not change the name of the file but rather adds a line of regular-size text in the upper left corner of the generated document. It supports variable analysis, it is thus possible to write a title such as ‘Waveforms for Fault Time: %{Fault_time} s’, where ‘Fault_time’ is a variable in the test.
The ‘Data Integrity’ option is not in the ‘View’ tab for processing. If checked, the data will be saved immediately during the test; if unchecked, the data will be saved to the disk only at the end of the loop. In this case, saving to the disk means writing the ‘.cfg’ file in [root directory]/data/[Name of test]-[0-9]. It works in combination with the ‘Saving Mode’ tab. If ‘Save nothing’ is checked, no ‘.cfg’ files will be written.
The print graphics option is not supported.
The PDF files are saved in the TestView project directory.
Processing and Post-Processing tabs
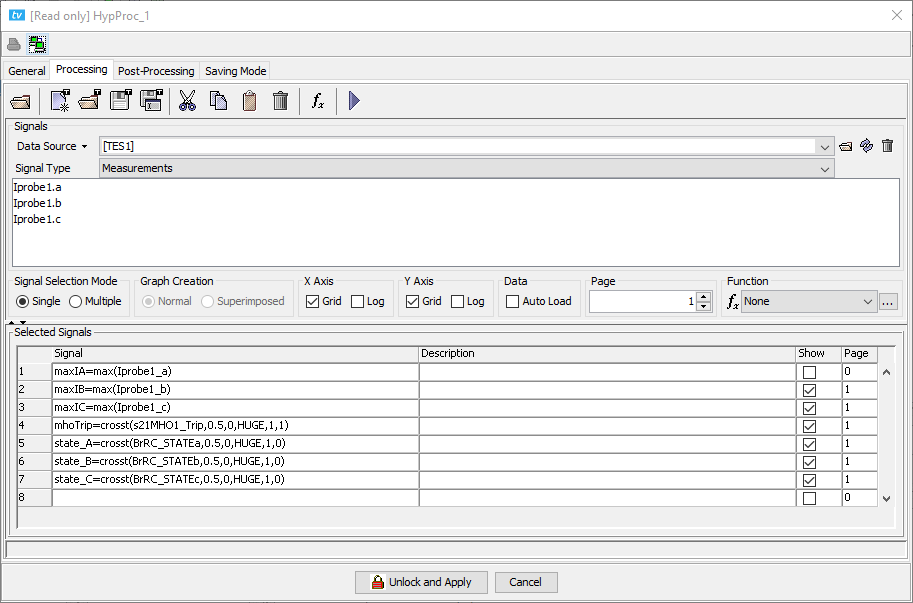
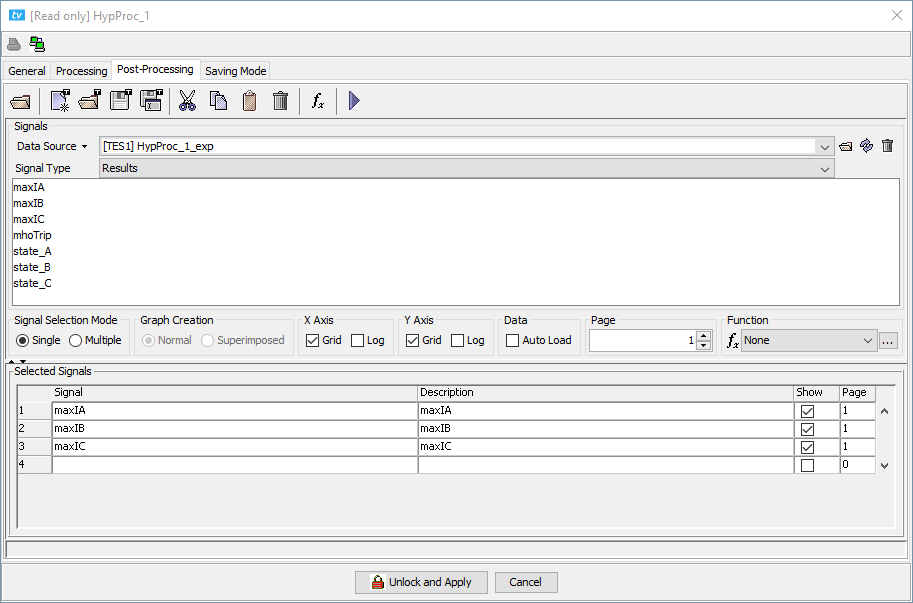
The 'Processing' and 'Post-Processing' tabs are literally instances of ScopeView and share the same behaviour. Please refer to ScopeView for more information in that regard. The 'Processing' tab is used to run the calculation on the values acquired in a single test whereas the 'Post-Processing' tab is used to compare results from several tests. Only values saved in a variable in the 'Processing' tab are available in the 'Post-Processing' tab (e.g. variable = formula).
When a test is running, if the 'Post-Processing' pop-up window displays only the last result (i.e. just one point instead of four when four tests were executed), it is because of the ‘Operation’ option in the Loop command. For more details on that matter, look here.
Where do the Signals in the 'Processing' tab and the 'Post-Processing' tab come from?
In the case of the 'Processing' tab, the signals come from the Signals key selected in the dropdown list of the 'General' tab. To define a key (of signals that can be selected in the dropdown list afterward), you need to go in the ‘Signals Manager’. It is accessible through the ‘Signals Key’ button in the 'General' tab of the 'Processing' command or through the ‘Tools > Signals Manager’ contextual menu in the main TestView window.
In the case of the 'Post-Processing' tab, the signals must be scalars that come from the 'Processing' tab. For example, in the 'Processing' tab, you could add:

In this case, the variable ‘Imax_phaseA’ will be accessible in the 'Post-Processing' tab. The signal ‘Fault_CMDa’ is not accessible in the 'Post-Processing' tab because it is not scalar.
Saving Mode Tab
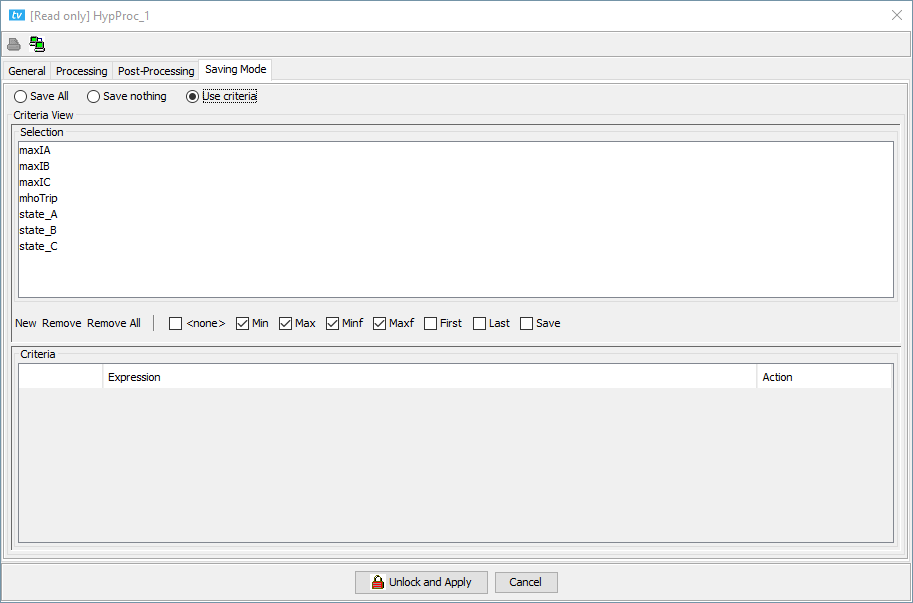
In this tab, it is possible to define criteria to save the waveforms in COMTRADE format or not. By default value, everything calculated in the 'Processing' and 'Post-Processing' tabs is saved. It might, however, be useful to use criteria to manage disk space and discard unnecessary results.
Criteria Description
| <none> | ignore the criteria line, the criteria is never met |
| Min | keep the test with the minimum value of the expression |
| Maxf | keep the test with the maximum value of the expression |
| Minf | keep the test with the finite minimum value of the expression |
| Maxf | keep the test with the finite maximum value of the expression |
| First | keep the first test of the loop sequence |
| Last | keep the last test of the loop sequence |
| Save | keep the test if the expression is true |
For example, in the Figure below, TestView keeps all the tests that meet one or many of the following criteria:
- The test with the maximum value of “Ia”
- The test with the finite minimum value of “Ia”
- The last test of the sequence
- All tests where “a” is greater than 616900

OPAL-RT TECHNOLOGIES, Inc. | 1751, rue Richardson, bureau 1060 | Montréal, Québec Canada H3K 1G6 | opal-rt.com | +1 514-935-2323