Documentation Home Page ◇ RT-LAB Home Page
Pour la documentation en FRANÇAIS, utilisez l'outil de traduction de votre navigateur Chrome, Edge ou Safari. Voir un exemple.
Configuring the Floating License Server
- Sylvain Ménard
Since RT-LAB v. 2020.1, users are able to deploy RT-LAB with cloud (floating) license features.
When this feature is implemented, each target must be activated with a valid cloud license to run a simulation.
The following steps enable cloud licensing in RT-LAB.
All licensing can be requested through the RT-LAB interface, but for questions please contact OPAL-RT Technical Support.
Before You Start
Before activating a target, users should ensure that their systems (both host and target) are correctly configured by following these steps:
| RT-LAB must be installed on your Windows host computer. | See Installing RT-LAB on your Host Station. |
| Each target must be available in RT-LAB. | See Connecting your Host Computers to your Real-Time Target for an OPAL-RT chassis or Setting Up the Windows PC as a Target Node for Windows. |
| RT-LAB must be installed on each target. | See Installing RT-LAB on the target Node for an OPAL-RT chassis. |
Currently, RT-LAB supports two distinct types of features regarding the floating license server:
- Simulation Time Measurement: With this license, a user can have multiple instances of real-time targets where simulation time is measured as it elapses, and captured by the license server.
- In this scenario, users can run simulations as long as they have remaining time on the license server.
- Floating License for the Number of Cores: With this license, users can have multiple instances of real-time targets where the number of cores used in all stations combined is managed by the license server.
- RT-LAB contacts Opal-RT's license server to reserve the number of the cores needed for simulation before it runs. If RT-LAB cannot retrieve the proper license information from the server, the simulation is ended.
Step 1: Request and install local licenses for RT-LAB targets
- You should install proper local license files on all the targets you want to use with the license server.
Note: Users must specify the type of license they plan to use when contacting Technical Support to acquire license files. Users can request licenses from the RT-LAB menu through Help > Request a license.
The file HttpLicenseRequestConfiguration.json should be created in RT-LAB's root folder:
| Windows | In RTLAB_ROOT at the path C:\OPAL-RT\licserver |
| Linux | In REDHAWK_OPALRT_ROOT at the path /usr/opalrt/license |
The file HttpLicenseRequestConfiguration.json should provide the following contents:
| bridge_ip | @ip of the host handling the bridge See the bridge_ip entry in the code block below. |
| bridge_port | @port where the bridge should expect connections. See the bridge_port entry in the code block below. |
| license_id | provided by the name of the file .productkey. See the license_id entry in the code block below. |
| request_timeout | timeout used to wait for data from the bridge (String). See the request_timeout entry in the code block below. |
Example of HttpLicenseRequestConfiguration.json
	{
		"bridge_ip" : "127.0.0.1",
		"bridge_port" : "9365",
		"license_id" : "myLicenseId",
		"request_timeout" : "15"
	}
Step 2: Configure Opal-RT's license server
Note:
- No installer is provided, but the licensing software package is distributed as a simple archive (ZIP file for Windows or TAR file for Linux) extracted to a local folder.
- Supported platforms are Windows and CentOS 7.6.
Users should receive the following files:
| oplicensebridge.exe | (Windows)/oplicensebridge (CentOS 7.6) |
| OpLicenseBridge.config | |
| oplicenseserver.exe | (Windows)/oplicenseserver (CentOS 7.6) |
| OpLicenseServer.config |
Extract the files from the ZIP or TAR archive.
On Linux, use the command:
tar -xvf <tarfilename.tar>
In the License server folder, edit the OpLicenseServer.config with a text editor and adjust the following settings:
| ConfigReloadDelay | 1 |
| Port | Available port number of your choice for HTTP communication |
| LogFile | "OpLicenseServer.log" |
| ReadTimeout | 10 |
| WriteTimeout | 10 |
| RepoPath | "idb" |
| CloseInactiveSessionAfter | 15 |
| CleanUpInterval | 15 |
| RequestFolder | "requestlogs" |
| RequestLogQueueSize | 100000 |
| "OpalLicenseFile" | "opallicense.bin" |
- If you are using a floating license: Place the opallicense.bin file you received from OPAL-RT Support in this folder.
- This step is not required for the time measurement license type. Skip to Step 3 if you are using this license type.
- Start the oplicenseserver (.exe) application.
Make sure the firewall allows use of the port selected in the configuration file.
Note: You can request a server license from RT-LAB through Help > Request a license.
Example of OpLicenseServer.config
{
	"ConfigReloadDelay": 1,
	"Port": 9461,
	"LogFile": "OpLicenseServer.log",
	"ReadTimeout": 10,
	"WriteTimeout": 10,
	"RepoPath": "idb",
	"CloseInactiveSessionAfter": 10,
	"CleanUpInterval": 15,
	"OpalLicenseFile": "opallicense.bin",
	"RequestFolder": "requestlogs",
	"RequestLogQueueSize": 100000,
	"OpalLicenseReloadInterval": 0.5
}
Step 3: Configure Opal-RT's license bridge
In the License server folder, edit the OpLicenseBridge.config with a text editor and adjust the following settings so they match your particular case:
| ServerURL | Complete URL of the server with port number as configured in the preceding section. Example: http://serverpc:9461 |
| ToleranceNoSrv | 15 |
| TransmitDelay | 1 |
| RemainingTimeDelay | 5 |
| MsgQueueSize | 100000 |
| ConfigReloadDelay | 1 |
| Port | Available port number of your choice for HTTP communication |
| LogFile | "OpLicenseBridge.log" |
| ReadTimeout | 10 |
| WriteTimeout | 10 |
| MaxBurstMsgCount | 3 |
- Start the oplicensebridge (.exe) application
- Make sure the firewall allows use of the port selected in the configuration file.
Example of OpLicenseBridge.config
{
	"ServerURL": "http://localhost:9461",
	"ToleranceNoSrv": 15.0,
	"TransmitDelay": 1,
	"RemainingTimeDelay": 5.0,
	"MsgQueueSize": 100000,
	"ConfigReloadDelay": 1,
	"Port": 9365,
	"LogFile": "OpLicenseBridge.log",
	"ReadTimeout": 10,
	"WriteTimeout": 10,
	"MaxBurstMsgCount": 3
}
Step 4: Submit a product key (for Simulation Time Measurement license type ONLY)
- This step is not needed for floating licenses. Skip this step if you are using a floating license.
- A product key was provided with your licensed product. It is usually contained in a file named <license ID>.productkey
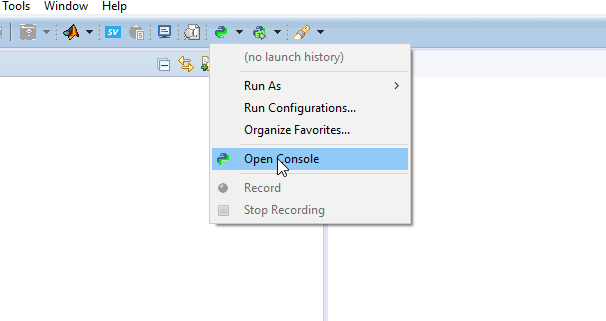
- To submit the product key to the license server, start a Python console (Tools > Python > Open Console) in RT-LAB:
Insert the following code:
import requests
r = requests.post('http://<server name or IP>:<server port>/useraccountv1', json={"Version":1,"Request":{"Action": "submitproductkey","ProductKey":"<contents of the product key file>"}})
print r.content
print r.status_code
If the submission was successful, the status code should be 200. Otherwise, r.content provides details about the failure.
Assuming the OPAL-RT product is properly configured to access the bridge, the licensed product is ready for use.
Licensing Troubleshooting
| If this situation exists... | ...This may be the outcome |
|---|---|
| If the HTTP license configuration file HttpLicenseRequestConfiguration.json is not present... | the model won't be loaded and an error is displayed in the display logs. Please be advised that the user should create the HttpLicenseRequestConfiguration.json file. |
| If the license bridge or server is not up and running... | the connection fails and the load is ended by RT-LAB. |
| If there are not enough cores available for this LicenseId (or not enough time for time measurement licenses)... | the load is ended by RT-LAB. |
| If the signature in the messages received from the bridge can't be verified... | the load is ended. |
| While RT-LAB is running the simulation, it periodically (every minute) contacts the license server to upkeep the reservation of the floating license. | If the communication between the server/bridge and simulation is disrupted, RT-LAB ends the simulation. |
OPAL-RT TECHNOLOGIES, Inc. | 1751, rue Richardson, bureau 1060 | Montréal, Québec Canada H3K 1G6 | opal-rt.com | +1 514-935-2323
Follow OPAL-RT: LinkedIn | Facebook | YouTube | X/Twitter