Documentation Home Page ◇ Specialized Solutions Home Page
Pour la documentation en FRANÇAIS, utilisez l'outil de traduction de votre navigateur Chrome, Edge ou Safari. Voir un exemple.
BERTA TestDrive Menus
TestDrive has a standard menu bar with the options described in the table below. Most of these are single-action commands. Some options open windows requiring further commands. Those options are described separately after the table.
Main Menu | Menu Options | Sub-Menu | Description |
|---|---|---|---|
File | Logout | Logs the user out, closes TestDrive and returns to the Login window | |
Close | Closes TestDrive | ||
Save | Saves the current configuration and any changes made during the session. Note: The parameters from the simulation control interface cannot be saved using this command. These parameters are defined during compiling. However, they can be saved and retrieved using a Python script. These parameters are calibration gains and offsets of the analog I/O channels, the current and voltage scaling gains and the test AC generator parameters. | ||
Save As | Saves the current configuration as a new file | ||
Save For Run Mode | Prepares the current configuration for Run Mode. The Run Mode allows TestDrive to run faster but does not allow to change the current configuration (assignments, aliases, etc.). | ||
Pack | Creates a compressed (zip) file of the current configuration (see “Pack”) | ||
Unpack | Extracts a compressed file to use with TestDrive (see “Unpack”) | ||
Exit | Closes TestDrive | ||
View | Refresh Signals | Refreshes the list of the Dynamic Signals in the Signal Tree (the dynamic signal list can be edited from the Probe Control) | |
Show Acquisition Group | Acq.Gr# | Shows the Acquisition group (from 1 to 24) | |
Show Signal Tree | Shows all the signals and parameters of the TestDrive model and switches for the Assign Mode | ||
Show Module Config | Disabled - not used | ||
Show Panels | Disabled - not used | ||
Show Primary Chassis | Disabled - not used | ||
Show Secondary Chassis | Disabled - not used |
Main Menu | Menu Options | Sub-Menu | Description |
|---|---|---|---|
Operate | Release Signal Control | If selected, TestDrive will stop controlling the value of the signals and parameters, allowing other applications to change these values. Note that this is automatically used when running a Python Script through the TestDrive interface. | |
Auto-Generate Aliases | Automatically adds an alias to every signal and parameter of the current model | ||
Reload Latest Default Parameter Values | Reverts to last saved model values, before any unsaved changes that were applied to the parameters (i.e. reloads the .param file associated to the current configuration) – See Make Current Parameter Values Default menu | ||
Reload Model’s Default Parameter Values | Replaces all parameter values with the values defined in the Simulink model (i.e reloads the default .param file of the model) | ||
Make Current Parameter Values Default | Saves all parameter values to a .param file that may be reloaded later – See Reload Latest Default Parameter Values. These values will also automatically be applied whenever this configuration is loaded. | ||
Make Current Script Default | Makes the last executed Python script the default script for this configuration: each time this configuration is loaded, this script will be available directly from the Run Script button. | ||
Panels | Load | Opens a LabVIEW panel from the file system. | |
Set Current As Default | Currently opened panel will automatically be opened next time this configuration is loaded. | ||
Panel Components | Disabled - not used | ||
Recently Loaded Panels | Disabled - not used | ||
Tools | RT-LAB | Parameter Control Probe Control | Though accessible, it is not recommended to use these menu options (which open the RT-LAB Parameter and Probe Control services). |
Configure System | Disabled - not used | ||
Primary Chassis | Disabled - not used | ||
Preferences | Opens the Preference window (see Preferences) | ||
Options | Opens the Options window | ||
Unassign All | Disabled - not used | ||
Help | Show Context Help | Opens a small pop-up window to display the help page associated to the currently hovered item | |
| Online Help - User Guide | Disabled - not used | ||
| Online Help - Quick Reference Guide | Disabled - not used | ||
| Online Help - System Administration Guide | Disabled - not used | ||
| About TestDrive | Opens the About window that displays information about the TestDrive version. |
File Menu
Most of the options in this menu are single-action commands. The Pack and Unpack options open windows allowing to compress or extract files.
Pack
Saves all the directories and files required to compile and run a BERTA application in real-time for a given configuration in a compressed file (.zip).
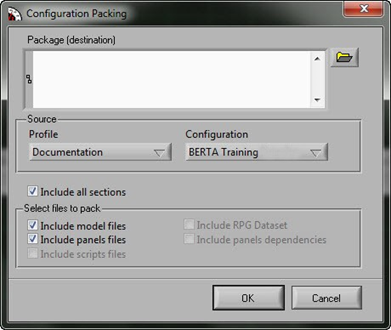
Click File and select Pack to open the Configuration Packing window.
The Profile and Configuration options default to the current profile and configuration. However, you can make a selection from the profiles and configurations available.
You can also specify what types of files to include (choices available depend on the configuration being compressed).
Unpack
Extracts compressed configurations used with a BERTA application.
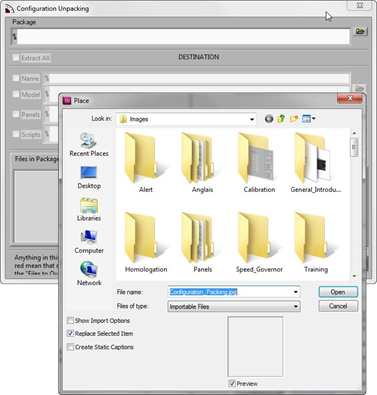
Click File and select Unpack to open the Configuration Unpacking window.
The file location window automatically opens to select which file to unpack.
Click Open to load all the configuration files.
Make sure that all file paths listed are correct, and click Extract to decompress the configuration.
Tools Menu
Most of the options in this menu are single-action commands. However, the Preferences and Options choices open windows that require further action.
Preferences
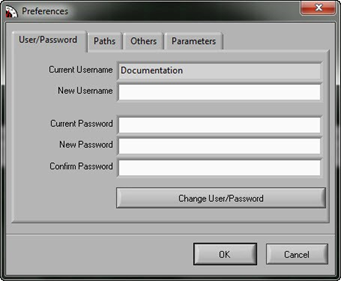
Opens a window with four tabs used to change TestDrive preferences.
| User/Password | Changes user profile and password. |
|---|---|
| Paths | Changes file access paths. |
| Others | Selects automatic activation of pop-up windows. |
| Parameters | Selects whether to display a warning message for unsaved parameter changes when leaving the application. |
Options
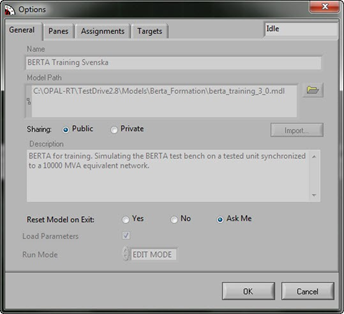
Opens a window providing four tabs used to set configuration parameters.
| General | Specifies whether to automatically or manually reset the model. |
|---|---|
| Panes | Specifies which panels to display in the main TestDrive screen. |
| Assignments | Selects whether to display captions when signals are assigned or unassigned. |
| Targets | Adds new targets or assigns targets to your configurations. |
Control and Command Toolbars
In addition to the menu bar at the top left, TestDrive provides toolbars with buttons allowing users to change displays and parameters and send commands to the model.
These toolbars are found in the Control panel (left side of screen) and the Command panel (right side of screen).
Control Panel Toolbar
The Control panel toolbar is part of the main screen and controls the execution of a BERTA application. The top section is common to all applications.
The Panels section in the middle is specific to each application and selects the panels to display. The options available depend on the application executed and display type.
Control Panel Toolbar | Toolbar Buttons | Description |
Mode. Displays the Signal Tree structure | ||
Run/Stop script. Click Run to start a script. Click Stop to stop a script. | ||
Edit Script lets you edit the scripts: only available if the Python software is installed on your workstation. | ||
Load Script. Lets you load an existing Python script. | ||
*Opens the Graphs 1 to 5 panel. | ||
*Opens the Graphs 6 to 10 panel. | ||
*Opens the Graphs 11 to 15 panel. | ||
*Opens the Graphs 16 to 21 panel. | ||
*Opens the Controller panel. | ||
*Opens the Interface panel. | ||
*Opens the Islanded Units panel. | ||
*Opens the Islanded Loads panel. | ||
*Opens the Virtual Grid panel. | ||
| Load Panel. Allows loading other Labview panels. | ||
Current Pop-Up panel. Lets you undock the current panel from the main screen. NOTE: Once undocked, the panel cannot be redocked to its original docking point. To do this, you must close the panel. |
* These buttons are from the BERTA On-Site Tests application
Command Panel Toolbar
Table 2 shows an example of the Command panel toolbar. It displays parameters common to the simulation executed and lets users perform command functions. The toolbar shown has buttons and fields available with the BERTA On-Site Tests application. The options depend on the application executed and display type.
Command Panel Toolbar | Toolbar Buttons | Description |
GO Acquis | Starts signal acquisition. Click once to start (bright green indicator) and click again to stop (dark green indicator) | |
GO Disturbance | Starts to insert a disturbance. Click once to start (bright green indicator) and click again to stop (dark green indicator) | |
Reset dFreq Sim | Resets the simulated frequency error and returns to initial conditions of the virtual AC generators, if necessary. Click to reset (bright green indicator during reset) | |
GO BERTA switch | Click to turn on the switch (changes from red to green) | |
Mean P S values | Sets the mean values for power and main servomotor position during the period defined in the Period P S field | |
Mean speed value | Calculates the mean value of the rotation speed during the period defined in the Period Speed field | |
Period P S. | Used with Mean P S values to set the computing period required | |
Period speed | Used with Mean speed value to set the computing period required | |
Toolbar Fields | Description | |
Test No. | Increments the test number by one every time GO Acquis is disabled | |
File status | Shows the file status where the tests are being saved. | |
Overruns | Increments each time the total processing time is longer than the time step. | |
Computing Time | The time required by the workstation to make all the calculations within the one-time step. | |
Idle Time | Period of time between each time step and total computing time, in microseconds. | |
Time Step | 50 microseconds | |
Acquisition Time | Displays the acquisition time |
OPAL-RT TECHNOLOGIES, Inc. | 1751, rue Richardson, bureau 1060 | Montréal, Québec Canada H3K 1G6 | opal-rt.com | +1 514-935-2323
Follow OPAL-RT: LinkedIn | Facebook | YouTube | X/Twitter


