Documentation Home Page ◇ HYPERSIM Home Page
Pour la documentation en FRANÇAIS, utilisez l'outil de traduction de votre navigateur Chrome, Edge ou Safari. Voir un exemple.
TestView Command | General | TableOut
The command TableOut regroups the functionalities related to exporting the results from the test sequence in CSV or in Excel format. It is usually located and handled at the end of a test sequence.
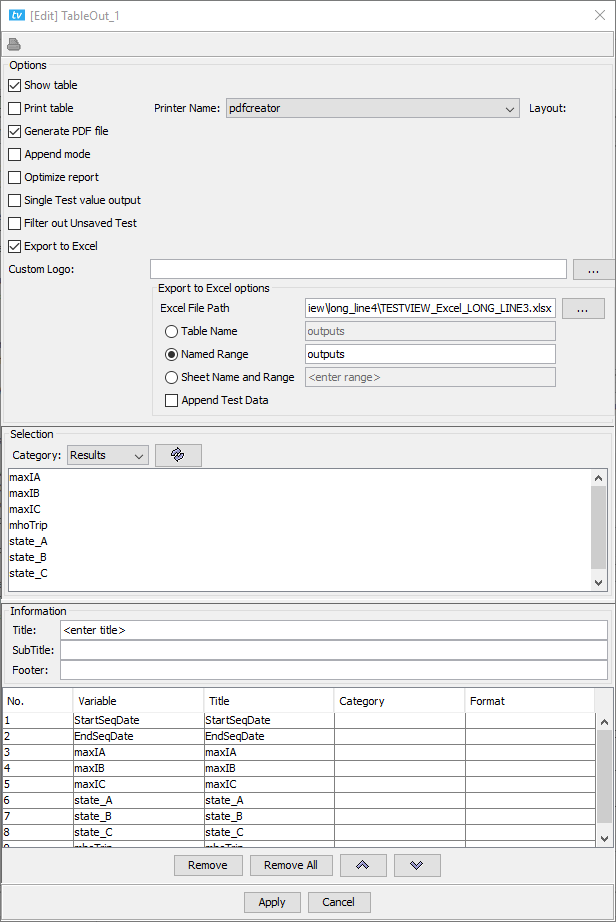
Options
| Show table / Print table / Generate PDF file | This works in combination with show / print / PDF table in the 'View' tab of the main TestView window. It displays the results in a dialog box (show) or prints the results (print) or generates PDF (PDF) if both are checked (in TableOut and the 'View' tab). |
| Append mode | Add the results in the same csv document if checked OR create several csv documents if unchecked. The documents are located in [root directory]/[Name of Study]/TableOut_1/[Name of Test] – [loop number].csv. |
| Optimize report | If this option is checked, it will go through every row (from last to first) of the report and make sure there is at least one data in the row. If not, it will remove the row. |
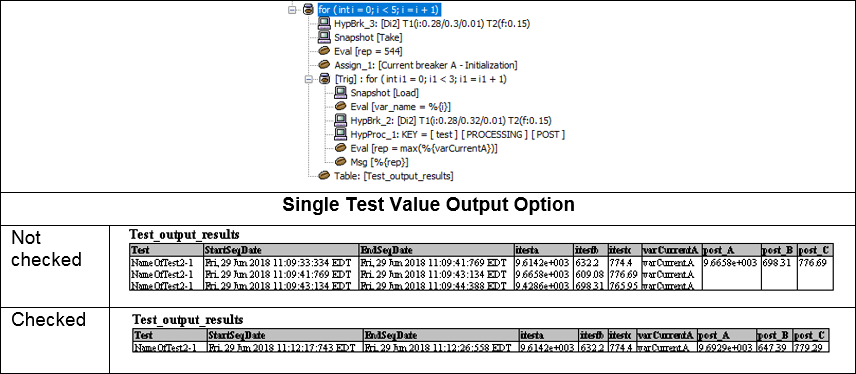
| Single Test value output | It means that only one row will be added every time this function is called. For instance, in the case below, there are two loops. The first loop starts, it sets some parameters and takes a snapshot. The second loop then starts and processes three times the simulation with different breaker operation times. Once the three iterations are done, TableOut saves some of the variables in a table. If the ‘Single Test value output’ option is checked, it will only save the first of the three iterations. Conversely, it will save all three iterations if it is not checked. |
| Filter out Unsaved Test | This works in combination with the ‘Saving Mode’ tab from the HYPERSIM Processing command. That tab offers the possibility to use criteria to save the values or not. For example, assuming that only 20 out of 100 tests meet some given criteria, only those tests will be exported to Excel. |
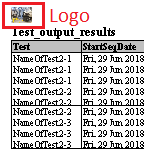
| Custom Logo (path) | Adds a small icon in the upper left corner of the table output only when the ‘Show table’ option is checked in the ‘View’ tab. It does not add it to the csv generated document nor in the excel output document. |
| Export to Excel | Export values to an Excel file. The file does not need to be in the same folder as the script. It can be the same file as the one read from but does not have to. If using 'Table Name', be careful to select the same number of columns as predefined in the Excel file. In the case of 'Named Range', the test sequence will resize the output table if it is too small. The 'Sheet Name and Range' works only with the actual cell numbers. For instance: “sheet1!$D$53:$O$66”. For more information on how to interface Excel with TestView, look here. When exporting to a non-existing file, a new file will be created and the data will appear in a table. When exporting to an existing file but the table with the given name doesn’t exist, a new sheet will be added to the workbook and a new table will be created to hold the exported variable values. |
| Append Test Data | If checked, the output data in Excel will not overwrite the same fields as the previous tests, but rather append the table, so that results from many test sequences can be saved in the same Excel table. |
Warning
The post-processing values are not necessarily saved to the right in the table report. It depends how data is saved (which depends on the ‘Operation’ checkbox in the Loop command). In the case of TableOut, the post-processing results appear on the same row as the processing results of the first iteration of the loop. It is different to the simulation report where the post-processing results are calculated after the last loop. On the other hand, it works with the 'Single Test value output' option (which would not account for the post-processing values if their appeared on the last row because that option keeps only the first row).
READ-ONLY OUTPUT EXCEL FILE
To export the results to Excel using the TableOut step, the Excel output file shall be closed before executing the test sequence. If the file is still in use, Excel and the operating system will prevent TestView from writing to the file. In this case, TestView will write the results to a new file named “theoriginalfilename_i” (with the index 'i' starting at 0 and incrementing until there’s no file inside the same folder having the same name).
OPAL-RT TECHNOLOGIES, Inc. | 1751, rue Richardson, bureau 1060 | Montréal, Québec Canada H3K 1G6 | opal-rt.com | +1 514-935-2323