Documentation Home Page ◇ Hardware Home Page
Pour la documentation en FRANÇAIS, utilisez l'outil de traduction de votre navigateur Chrome, Edge ou Safari. Voir un exemple.
OP7000 Installation and Configuration
Basic system cabling
The design of the simulation system includes quick, standardized I/O connections (either BNC or DB37F) and RJ45 connections for monitoring each channel individually.
The simulator is preconfigured according to your specifications and installation is as easy as mounting the simulator and connecting the appropriate cables from the simulator to the target.
Connecting monitoring devices
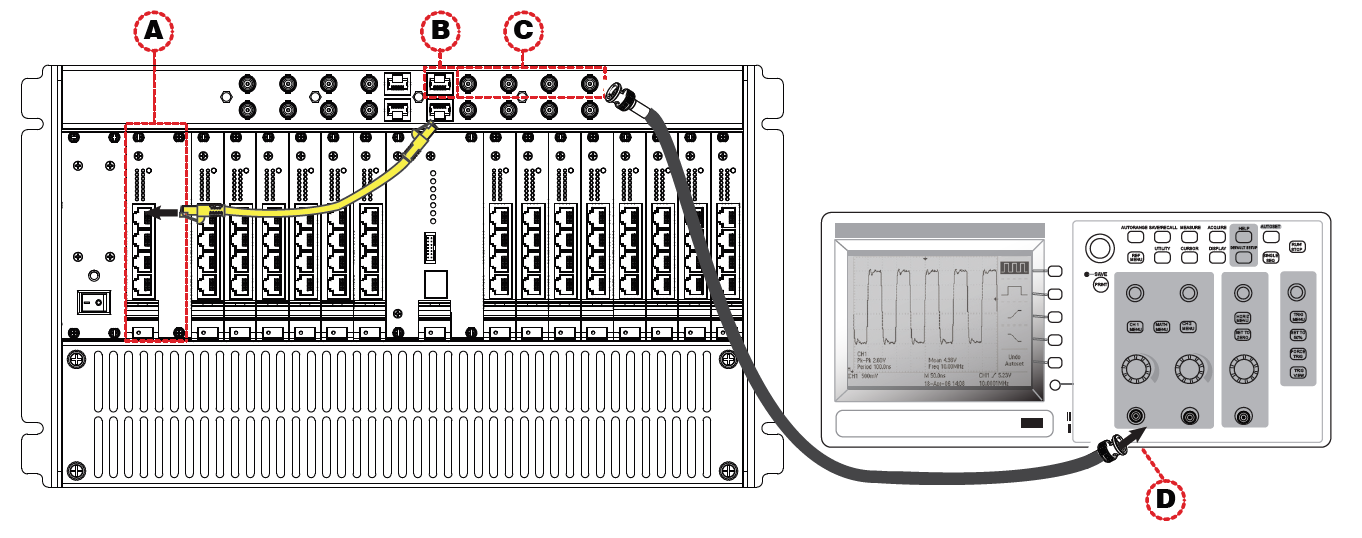
The OP7000 simulator offers quick, single-ended connections, through RJ45 and BNC connectors, to any monitoring device (i.e. oscilloscope, etc.). These BNC jacks let you monitor 4 channels individually. Simply follow these instructions:
Only connect RJ45 cables from the upper section (A) monitoring jacks to lower section monitoring panel (B, as shown). Connecting any other cable or device may result in damage to the equipment.
A. Connect one end of the RJ45 cable to the desired channels (A).
B. Connect the other end of the RJ45 cable to the monitoring connector (B)
C. Connect a BNC cable to a BNC jack and connect the other end of the cable to the desired monitoring device. The BNC jacks each connect to one of the 4 channels of the RJ45 Connector (A). In the example shown, the RJ45 cable is connected to channels 00-03. The mini-BNC cable jacks, identified as A, B, C, D, represent each channel in the following order; A = channel 0, B = channel 01, C = channel 02, D = channel 03.
D. Connect a mini BNC cable to the desired channel and connect the other end to your monitoring device (oscilloscope shown, D).
ATTENTION | Buffer amplifiers have a Gain of 0.1. |
Powerup Procedure
The following sequence must be respected to ensure that the system functions properly:
- Ensure that power cables from the OP7000 and other devices are connected to grounded, protected power sources (see red label on the power cable)
- Ensure that the PCIe cable is connected to both the back of the OP7000 and the real-time simulator
- Turn the back and front power switches of the OP7000 ON
- Plug the real-time computer network cable in the Ethernet port
- Turn the real-time computer ON
OPAL-RT TECHNOLOGIES, Inc. | 1751, rue Richardson, bureau 1060 | Montréal, Québec Canada H3K 1G6 | opal-rt.com | +1 514-935-2323
Follow OPAL-RT: LinkedIn | Facebook | YouTube | X/Twitter

